
It is required to configure a PV in neoom Ai to show PV production data and to allow neoom Ai to do correct calculations.
There are 2 possibilities how to configure a PV in connect.neoom.com:
-
Option 1: Directly configure the inverter (preferred way)
This option should be used in case the inverter is supported by neoom Ai. Please refer to https://neoom.com/neoom-ai-geraete for all supported inverters. - Option 2: Install a dedicated meter at the AC output of the inverter and configure it as "PV" in connect.neoom.com:
This option shall only be used in case the inverter is not listed in the compatibility list https://neoom.com/neoom-ai-geraete
Step-by-step guide for Option 2:
Step 1:
-
Go to the "meter" / "Zähler" section of https://neoom.com/neoom-ai-geraete and select one of the compatible meters.
-
Make sure the selected meter is suitable for measuring the PV output of your inverter:
- Choose a model which supports Modbus TCP or HTTP as communication protocol
You can see the supported protocol when you click at the specific meter model at the compatibility web site linked above. -
Check the maximum power rating of the meter
-
Consider whether you need single-phase or three-phase measurement
- Check the installation options at the customer site and choose a meter model with current transformer terminals (CT terminals) in case this makes installation easier.
- Purchase the choosen model
- Choose a model which supports Modbus TCP or HTTP as communication protocol
Step 2:
- Install the meter according to the meter specifications
Please note that only qualified electricians are allowed to do such installation. - Connect the meter to the home network (LAN) of the customer and make sure it is online.
Step 3:
- Go to connect.neoom.com and select the site for which you want to install the meter.
- Choose "Site Configuration" in the left navigation bar
- Click "Scan network"
- In case the installed meter is online, you will see it in the list of scanned devices which will appear a few seconds after you clicked the scan button.
Example: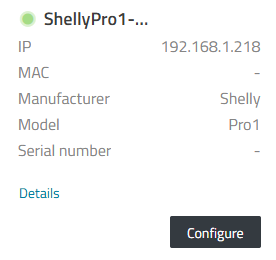
- Click the "Configure" button below the device.
- Remark: If you do not see the installed meter in the scan result list, it is not correctly connected to the network. Please refer to the installation guide of the meter for troubleshooting.
Step 4:
- After clicking the "Configure" button, a Device Configuration screen appears.
- Select the manufacturer, series and model and assign a appropriate name to the device (e.g. PV1)
- After selecting the model, it might be that a device specific hint appears in the UI.
Make sure you take this hint into account. - In the section "Configure device":
- Select the right communication protocol (ModbusTCP or HTTP) depending on which protocol the device supports. (This can be seen if you click on the device at https://neoom.com/neoom-ai-geraete)
- Choose "PV" as component
- Enter the kWp value of the connected PV panels
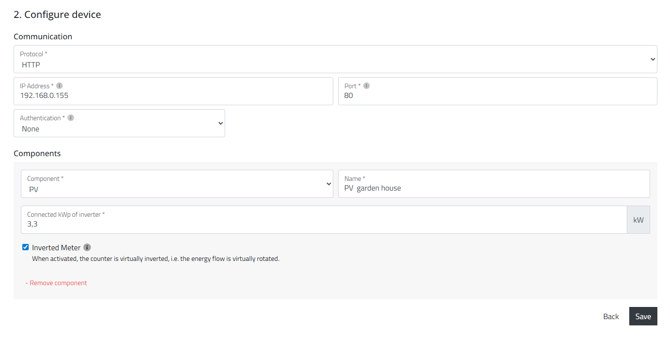
- Click "Save"
- IMPORTANT: After clicking "Save" you must click "Apply configuration" on the next page.
- After approx 1 min. the BEAAM should have taken over the configuration and the Meter should be shown as "online" in the device list ("Devices" in the left navigation bar)
Step 5:
- Click on "Devices" in the left navigation bar and click on the installed meter.
- Make sure that the measured power values are not negative.
- In case they are negative, go to "Site configuration", click on "Edit" for the meter and select the "Inverted Meter" check box at the bottom of the page.
- ick "Save" and "Apply Configuration"