Additional documentation for Altherma 3 integration with Home Hub:
Installer Reference Guide for Daikin Home Hub (German)
Installer Reference Guide for Daikin Home Hub (English)
Verbinden der Daikin Wärmepumpe mit dem BEAAM
Du hast 2 Möglichkeiten die Wärmepumpe mit einem LAN Netzwerkkabel mit dem BEAAM zu verbinden.
Möglichkeit 1: Verbindung über den BEAAM LAN Port
Dies ist die empfohlene Variante, da in diesem Fall die Wärmepumpe eine IP Adresse vom BEAAM zugewiesen bekommt. Stelle in dem Fall sicher, dass die Wärmepumpe so konfiguriert ist, dass sie eine IP Adresse über DHCP zugewiesen bekommt. Die hierfür notwendigen Einstellungen findest Du in der Dokumentation der Wärmepumpe.
Allerdings ist diese Variante aufgrund der Gegebenheiten beim Kunden nicht immer möglich, da keine direkte LAN Verkabelung zwischen Wärmepumpe und BEAAM möglich ist.
Möglichkeit 2: Indirekte Verbindung über den BEAAM WAN Port
Verbinde dazu die Wärmepumpe mit dem Router oder einem Switch vom Kunden LAN Netzwerk. Da der BEAAM ebenfalls über den WAN Port mit dem Kunden LAN Netzwerk verbunden ist, ist die Wärmepumpe über diesen Weg vom BEAAM aus erreichbar.
Empfehlung:
Die IP Adresse sollte direkt auf der Wärmepumpe konfiguriert werden. Dabei muss sichergestellt sein, dass die IP Adresse nicht aus dem im Router konfigurierten DHCP Adressvergabe-Bereich kommt und sich im gleichen Subnetzbefindet wie das gesamte Kunden LAN.
Alternative:
Die IP Adresse für die Wärmepumpe kann auch über DHCP vom Kunden Router vergeben werden. In diesem Fall ist sicher zu stellen, dass der Router immer die gleiche IP Adresse an die Wärmepumpe vergibt. Die kann bei den meisten Routermodellen je vergebener IP Adresse eingestellt werden.
ACHTUNG:
Bei Änderungen am Kunden LAN (zum Beispiel: Neuer Router) muss bei Möglichkeit 2 die IP Adresse der Wärmepumpe und in neoom CONNECT neu konfiguriert werden.
Konfiguration in neoom CONNECT
Schritt 1: Einloggen auf connect.neoom.com
Schritt 2: Standort wählen und "Standortkonfiguration" in der linken Navigationsleiste klicken.
Schritt 3: Auf "Scan network" klicken, um ein neues Gerät hinzuzufügen.
Nach einigen Sekunden erscheint eine Liste aller im Netzwerk gefundenen Geräte.
Sofern die Wärmepumpe richtig mit dem BEAAM verkabelt wurde netzwerktechnisch richtig konfiguriert wurde, findest du sie in dieser Liste.
Schritt 4: Bei der Wärmepumpen-Kachel auf "Konfigurieren" klicken
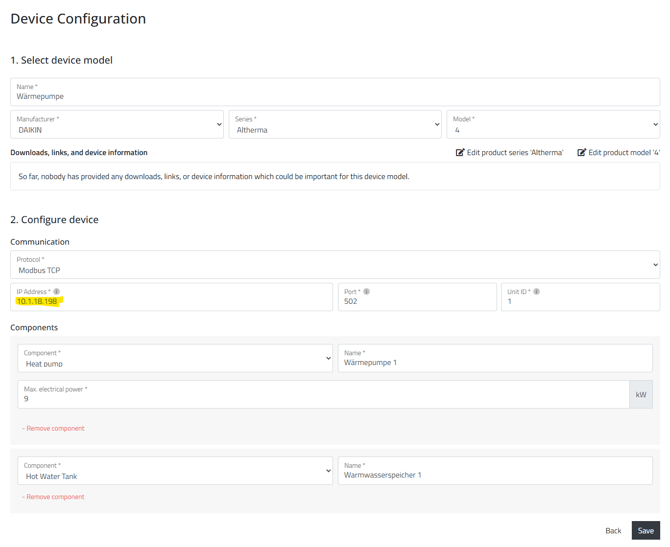
Schritt 4: Daten wie folgt ausfüllen und auf Save klicken. Hier bitte auf das richtige Modell (Altherma 3 oder Altehrma 4 achten). Das Feld für die IP Adresse ist bereits vorausgefüllt und darf nicht geändert werden.
Schritt 5: Auf "Konfiguration übernehmen" klicken
Schritt 6:
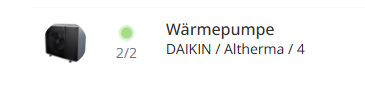
Nachdem die Konfiguration in den BEAAM geladen wurde sollte nach wenigen Sekunden bis Minuten die Wärmepumpe in der Geräteübersicht online (grüner Punkt) angezeigt werden. Klicke dazu im linken Seitenmenü auf "Geräte".
Sobald das Gerät online ist und du darauf klickst, kannst du die von der Wärmepumpe übertragenen Messwerte sehen: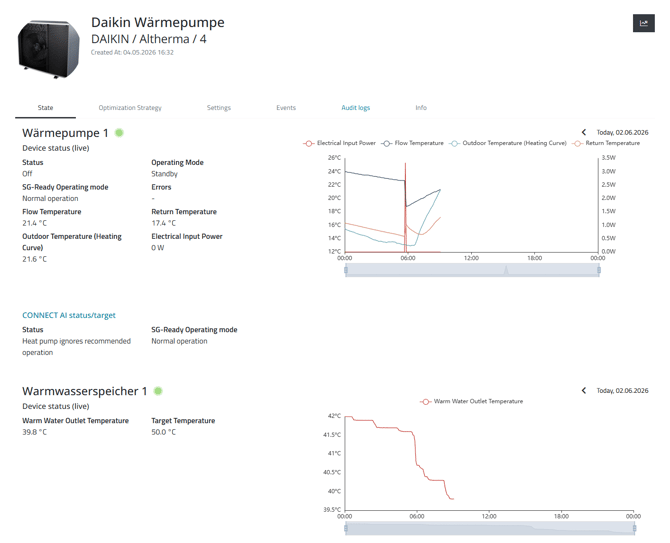
Notwendige Einstellungen für Daikin Altherma 4 in connect.neoom.com:
Im Unterschied zur Altherma 3 mit Home Hub unterstützt die Altherma 4 aktuell nicht die Möglichkeit, dass das Energiemanagementsystem einen Leistungswert (Verfügbarer PV Überschuss) an die Wärmepumpe schickt. Darum muss bei einer Altherma 4 Installation folgende zusätzliche Konfiguration durchgeführt werden:
Klicke in connect.neoom.com in der linken Navigationsleiste auf "Devices", wähle die Wärmepumpe aus der Liste aus und klicke dann auf den Tab "Optimization Strategy"
Power threshold for start recommendation:
Ab diesem Leistungswert des verfügbaren PV Überschuss signalisiert das Energiemanagement der Wärmepumpe eine Einschaltempfehlung.
Dieser Wert ist in Abhängigkeit zur PV Anlagengröße (kWp Wert) zu dimensionieren, so dass der angegebene PV Überschuss Leistungswert an typischen Tagen erreicht wird. Er soll aber nicht zu gering angegeben werden, da die Wärmepumpe einen bestimmten Mindestleistungswert für den Anlauf benötigt.
Power threshold for normal operation:
Dieser Wert hat bei Daikin Wärmepumpen keine Relevanz und soll auf 0 gesetzt werden.